3 Guitar Hacks For Learning Songs & Solos
So, you have the tab in front of you, maybe you’ve lined up a great video tutorial. You are ready to master that guitar part! You dive in, but after a few minutes things still don’t sound right and your dream of owning that riff or solo starts to fade. What can you do? Is there a faster way to go from zero to performing that guitar part with confidence?
Here are 3 tried and tested guitar hacks to get you jamming with the track in no time!
1. Play 1, leave 1
This is a really simple approach but one which is often overlooked. We always tend to tackle learning the full part before braving a performance with the track. Luckily, in the rock n roll world, most riffs fall into the good old ‘question & answer’ style, or repeat the same thing every bar. More often than not the tricky part is playing a new riff at full speed; so why not play every other bar or the ‘question’ part of the riff.
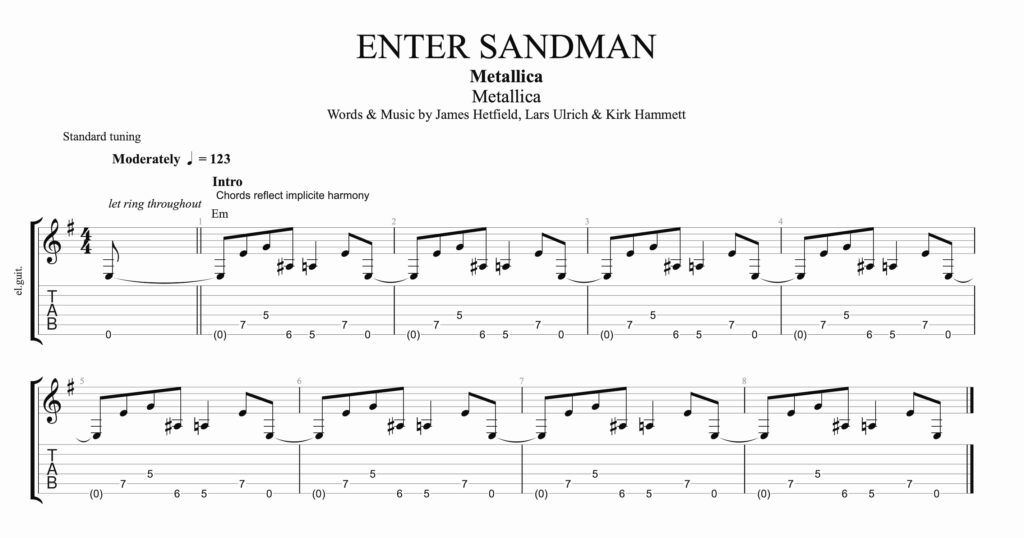
Let’s use Enter Sandman as an example:
“Enter_Sandman_Metallica_GuitarPro7_File”
(click on the picture to download the Guitar Pro 7 file)
The intro riff loops round and round. Playing this at speed and in time with the music within minutes of learning it could be tough. So simply master playing the phrase once (ending on the 6th note A string fret 7) and play this to the track or GP file playback – like an echo – you play one and the track plays one. This way you can play, rest and repeat; never feeling like the music is ‘running away from you’.
Want to learn a full breakdown of this riff? Check out this note for note lesson: watch Enter Sandman guitar lesson on licklibrary.com.
If a riff is too quick and you feel your momentum slipping then you can take this same approach by splitting the riff in half.
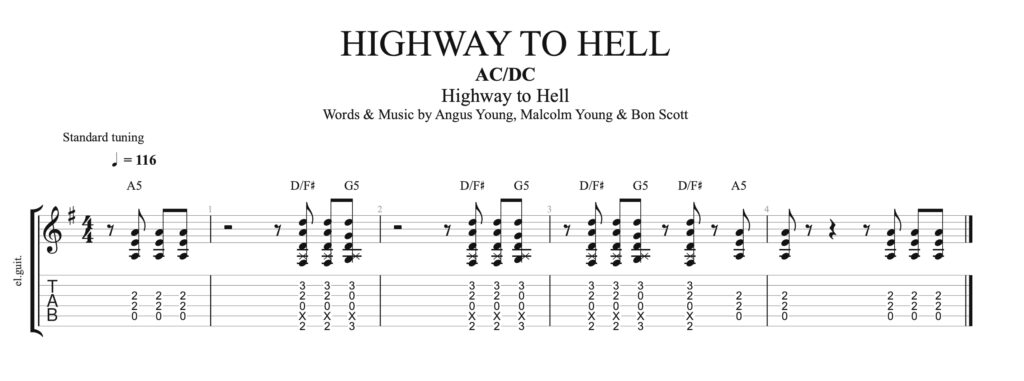
Take a look at Highway To Hell:
“Highway_to_Hell_AC/DC_GuitarPro7_File”
(click on the picture to download the Guitar Pro 7 file)
When students try this riff for the first time, it is always those quick chord changes in bars 3 & 4 that stump them. But why should that stop you rocking out with the track? Who says you can’t just learn bars 1 and 2? Those easy As and quick D to G are enough to get you through a whole verse instantly; leaving the tougher bars 3 & 4 to Angus and Malcolm! The beauty of this approach is that it gives you time to pause and focus on playing one small part accurately on repeat. By the time you have played through the whole verse, the chances are you will be ready to learn bars 3 & 4 and repeat the process again, letting the track play bars 1 & 2 this time round.
If you want to hear how this riff sounds and master those chord changes, here is a quick video to help you out: watch Licklabrary guitar lesson.
What about something more adventurous? You can apply this play 1, leave 1 rule to more advanced pieces too.
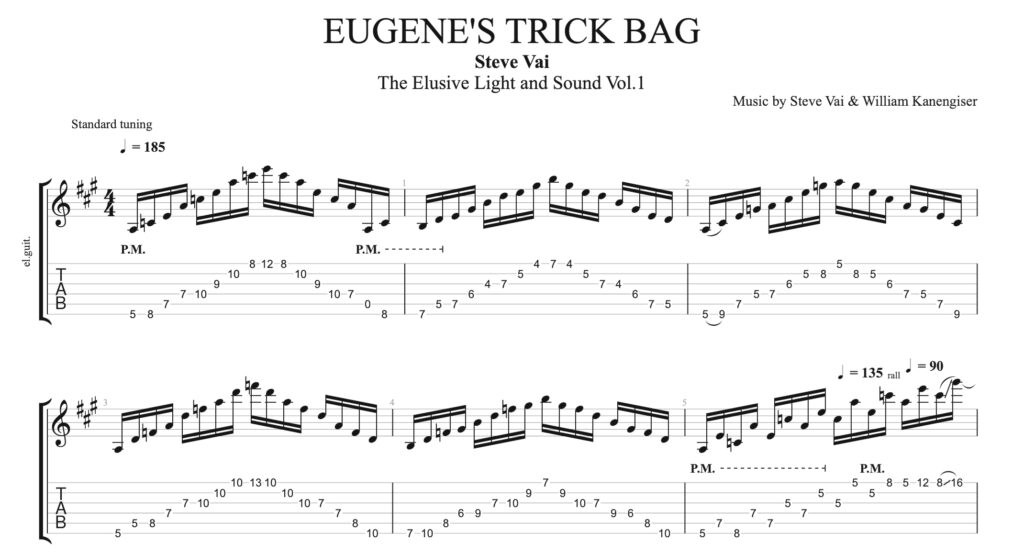
Check out the famous Steve Vai shred guitar duel, Eugene’s Trick Bag; famed for its unrelenting challenging arpeggios:
“Eugene’s_Trick_Bag_GuitarPro7_File”
(click on the picture to download the Guitar Pro 7 file)
Performing this at speed is a task which would require hours of practice before we could ‘keep up’ with the speed of the piece. In this case, why not solely focus on the ascending arpeggios – allowing you to ‘sprint’ for 2 beats and rest for 2 – you play up, and let Mr Vai descend the next arpeggio; simple! Suddenly this doesn’t feel so scary, right? Next you could tackle and perform only the descending arpeggios at speed. Got a guitar buddy? Try this as a duet – you play one arpeggio, they play the next. Too hard? How you play the first ascending arpeggios from bars 1 & 3, your buddy takes only the ascending arpeggios from 2 & 4.
The applications of this are huge! Chord changes feeling tricky? Play every alternate chord – problem solved! Solo too fast? Play every alternate phrase. Learning parts on this manner allows you to perform with the song sooner and helps you build the essential muscle memory you need master the full part.
2. Just Strum It!
We have all found ourselves picking through the first couple of bars of a tricky fingerpicked or arpeggiated chord part and wondering how long it will be until we can get to jamming! The solution is, again, a simple one – just strum the chords first.
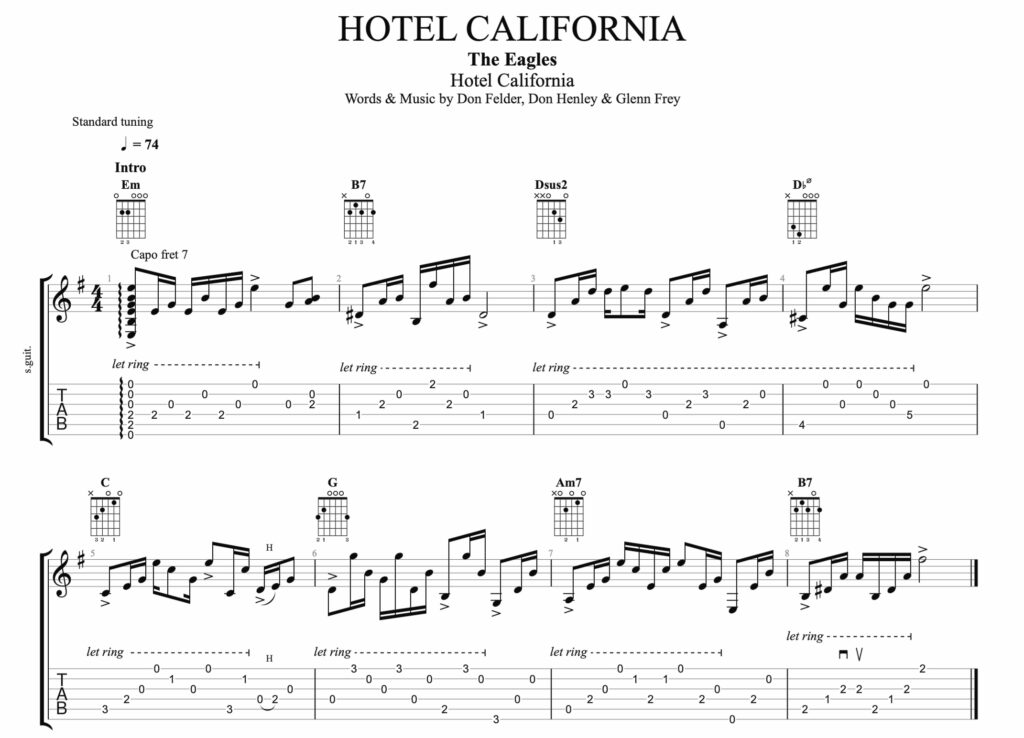
Let’s use a classic example – Hotel California:
“Hotel_California_GuitarPro7_File”
(click on the picture to download the Guitar Pro 7 file)
Mastering both the chord shapes and the right hand picking simultaneously often leads to being able to play each bar independently well, but being unable to link them together and hit those changes along with the track. So why not tackle your fretting hand first? Each bar starts with a very definite chord on the downbeat. Try to simply strum the chords along with the playback first. If you can do that, why not chose only one or two of the chords with which to add the arpeggios? Then perform again with the playback; slowly building your confidence whilst performing with the track each time.
To help you get to grips with the details of that famous picking pattern a little more, take a look at this lesson on www.licklibrary.com.
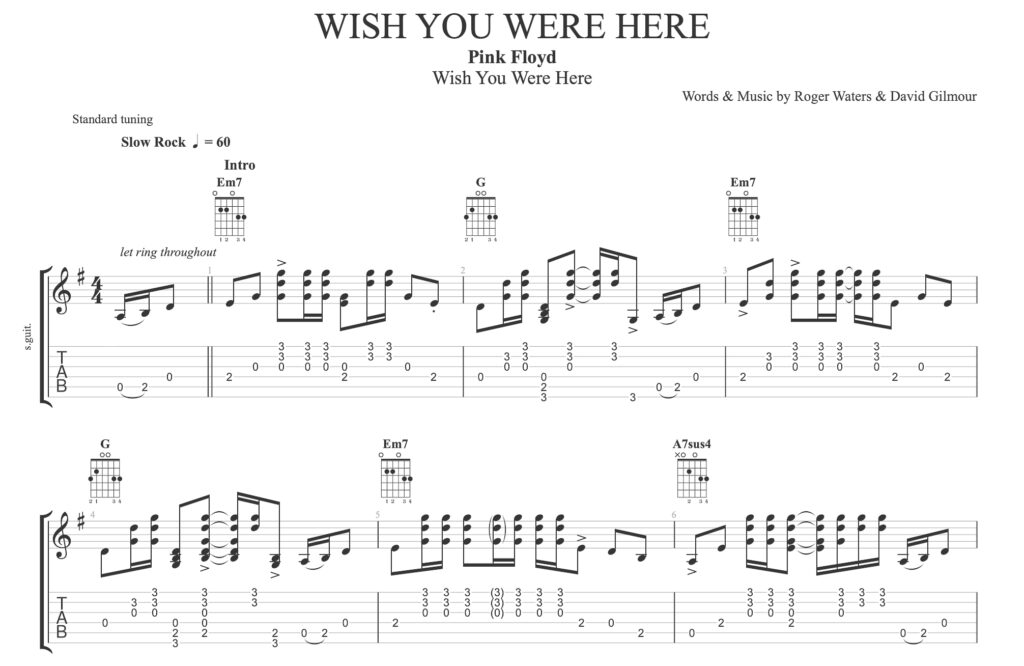
If you are trying to get to grips with a song such as Wish You Were Here:
“Wish_You_Were_Here_GuitarPro7_File”
(click on the picture to download the Guitar Pro 7 file)
To build this part, start by strumming those chords on beat one of each bar 1st. Once you can do that confidently, and in time, add those bass note lines. Got that down? Leave the bass lines and focus on the strumming pattern, performing with the Guitar Pro playback each time.
Ready to put it all together? Check you’re sounding like Gilmour here.
3. Loop That Lick: build That Solo!
If learning that entire solo is starting to feel like a drag, then why not build it one phrase at a time and still perform with the song? With the majority of rock songs, the guitar solo is in the same key as the rest of the track and, as a consequence, the licks from that feature guitar solo will work over the whole song!
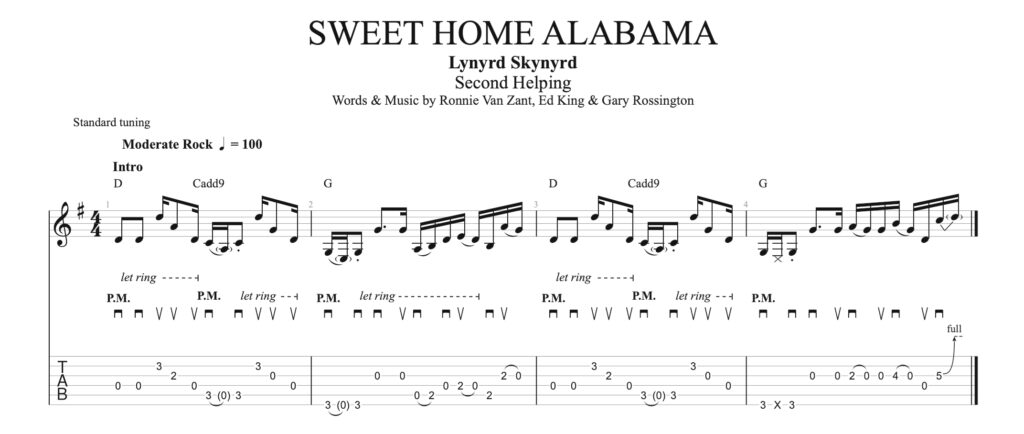
Let’s use Sweet Home Alabama as an example:
“Sweet_Home_Alabama_GuitarPro7_File”
(click on the picture to download the Guitar Pro 7 file)
Let’s take that first phrase only (bars …) during the solo, this phrase comes in on beat one of that first D chord, so why not play this on beat one of every D chord? Once you have used the loop function on Guitar Pro to get the lick under your fingers – put the track/Guitar Pro file on and play the lick over each repeat of the progression. By the time you get to the first chorus you’ll have that lick nailed! Now add the next lick (bars …) and perform along with the track, followed by the next phrase and the next. This method allows you to hear the solo within the context of the song, in time and rhythm.
Playing on repeat to the track also means you can really hear if your bends, slides and other nuances are working! Your confidence in playing the solo also gets a workout so, when the time comes to pull it out in one take, you don’t get any nervous jitters!
Take a walk through the guitar solo and and full song note for note.
Try this with other solos, or if there is a particularly taxing run or lick – lift that out and try to play it, at speed, over the entire song. Much more fun than using a metronome alone!
Licklibrary

Licklibrary is an archive of 20 years worth of online guitar lessons and courses, helping you learn the songs which inspire you and the techniques you need to develop as a player.
From the most famous riffs to full classic albums, from beginner lessons to the virtuoso skills!
Leave a comment
Your email address will not be published.
| Title | Artist | |
|---|---|---|
Hotel California

|
The Eagles | |
The Thrill Is Gone

|
B.B. King | |
Sweet Child O' Mine

|
Guns N' Roses | |
Poison

|
Alice Cooper | |
Master of Puppets

|
Metallica |

