
How to Connect Guitar Pro with Your DAW to Use VSTi
By integrating Guitar Pro with your DAW you can:
– improve your workflow
– create professional-sounding compositions with VSTi.
Here is a step-by-step quick guide to help you virtually connect Guitar Pro to your DAW using a virtual MIDI cable.
Any questions? Ask us in the comments!
What is a VSTi?
VSTi (Virtual Studio Technology Instrument) are plugins that simulate musical instruments. The majority of them can be controlled by MIDI events through a DAW.
Just like Guitar Pro’s RSE, using VSTi allows you to access a wide range of sounds. From pianos to synthesizers, drums, and guitars, you can bring your compositions to life with the sounds of your choice.
Preparation and Installation of the Virtual MIDI Cable
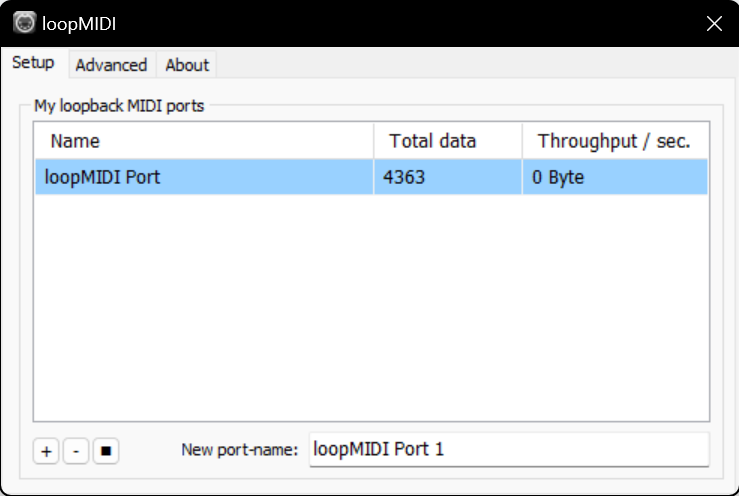
To connect Guitar Pro to your DAW, a virtual MIDI cable like loopMIDI is required.
Windows: LoopMIDI
- Download and install loopMIDI from the official website (free).
- Restart your computer after installation.
- Launch loopMIDI. A virtual port “loopMIDI Port” will be created by default.
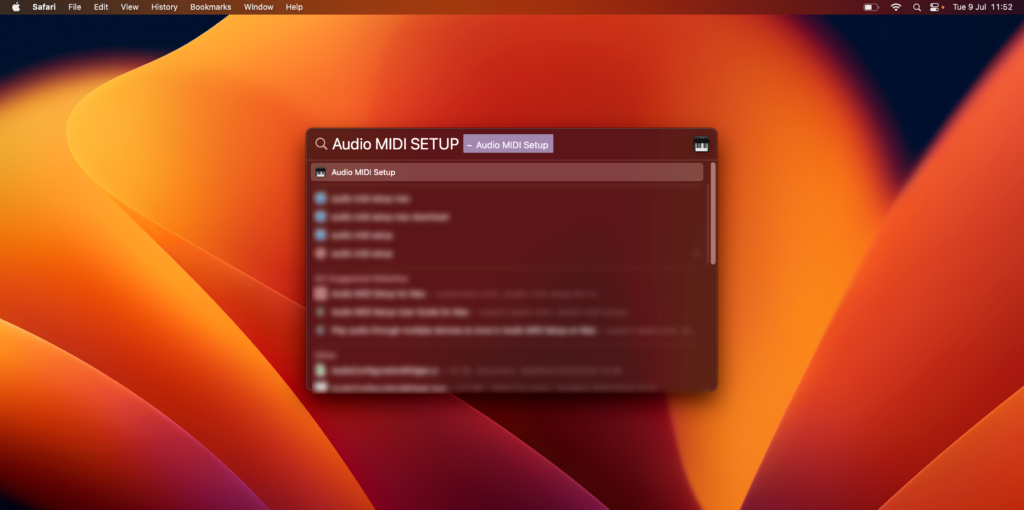
Mac: MIDI Studio
On Mac, you can use MIDI Studio to create virtual MIDI cables without third-party software.
- Step 1: open “Audio MIDI Setup” via Spotlight and choose “Show MIDI Studio” from the Window menu.
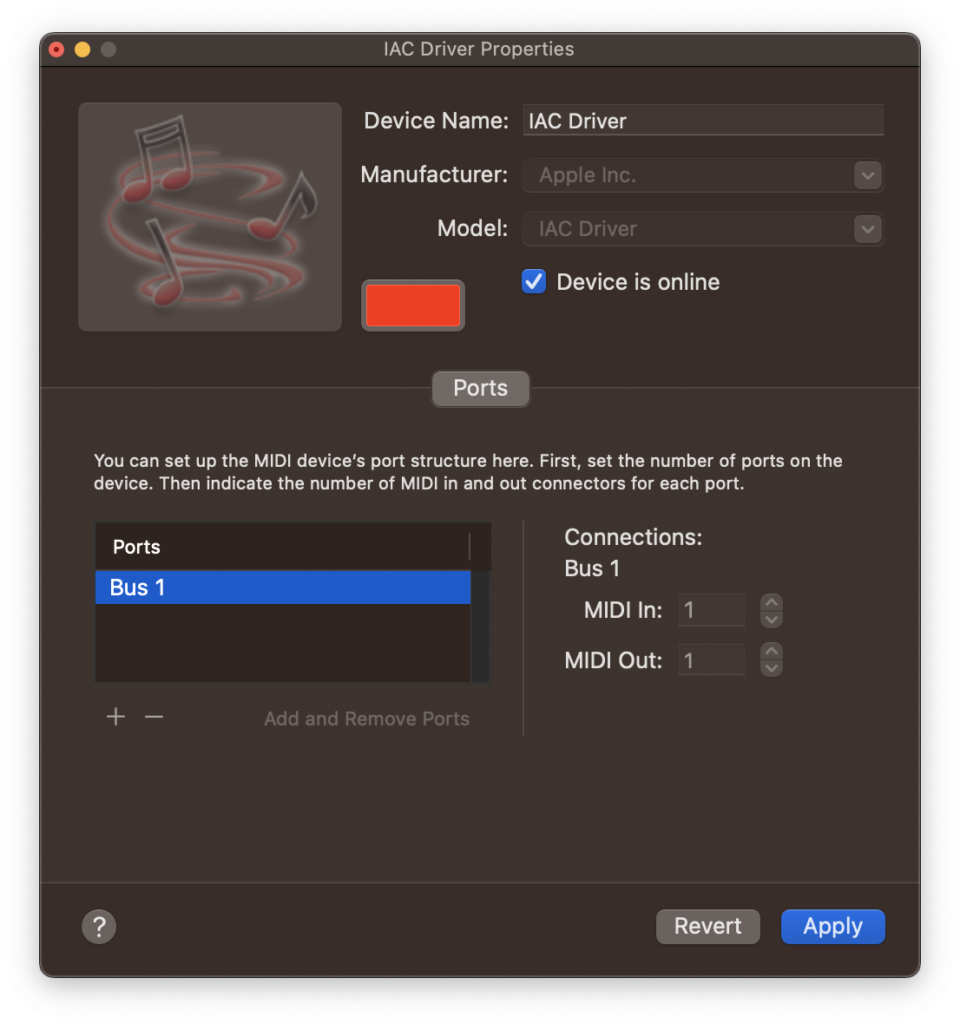
- Step 2: double-click the IAC Driver icon (Inter-Application Communication). An IAC Driver port will be created.
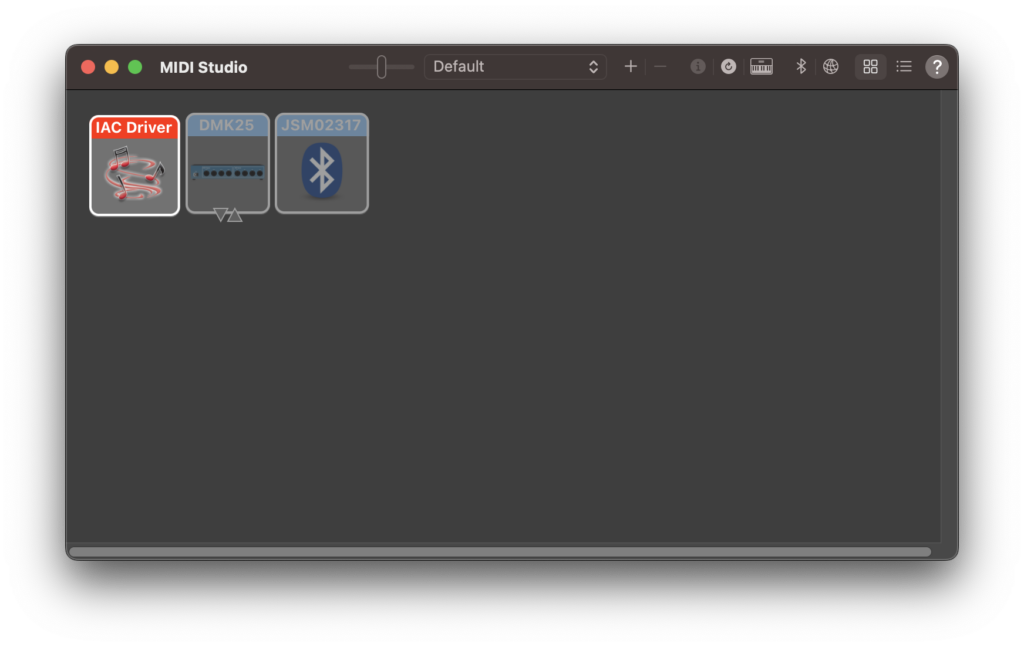
- Step 3: add virtual MIDI cables by clicking the + sign. You can create multiple ports if necessary, each for different applications.
Step 2: Configuring Guitar Pro to Transmit MIDI Data
Selecting the MIDI Output Device
- Open Guitar Pro and load your project.
- Go to Preferences via the top menu Guitar Pro 8 > Preferences > Audio/MIDI
- Select “loopMIDI” (Windows) or “IAC Driver” (Mac) as the MIDI output device.
Switching Tracks from RSE to MIDI
By default, Guitar Pro uses the Realistic Sound Engine (RSE) to produce sounds. However, instead of sending notes to the RSE, we will configure Guitar Pro to send MIDI events in real-time to loopMIDI (Windows) or IAC Driver (Mac). Here’s how to do it.
- Select a track in your score by clicking on it.
- Activate the Inspector via View > Show Inspector > Track. The Inspector allows you to see and modify the properties of the selected track.
- Switch the track from RSE to MIDI: In the Inspector, locate the sound section of the track and find the option to switch from RSE to MIDI by selecting the corresponding button.
By following these steps, your track in your Guitar Pro project will be configured to send MIDI notes in real time to loopMIDI (Windows) or IAC Driver (Mac).
Tip: Switch all Tracks from RSE to MIDI
To convert all tracks in your project at once, go to the menu at the top of the screen.
- Select Sound.
- Click “Convert All Tracks to MIDI”.
Assigning MIDI Channels in Guitar Pro
What is a MIDI Channel?
A MIDI channel allows the use of the same MIDI cable (physical or virtual) to transmit data from different instruments in parallel.
A MIDI cable supports up to 16 channels.
Assigning MIDI Channels in Guitar Pro
For each track in Guitar Pro, 2 MIDI channels are defined chronologically by the order in which the track is added. Each track generates two MIDI tracks, sent to two different MIDI channels:
- One channel for the instrument notes.
- One channel for the notes corresponding to Pitch Wheel effects (Slide, Bend, etc.).
It’s essential to know the MIDI channel used. Here’s how to proceed:
- Activate the Inspector:
- Go to View > Show Inspector > MIDI SETTINGS.
- Go to View > Show Inspector > MIDI SETTINGS.
- Select a track to see its details and assign the appropriate MIDI channels. For example:
- Guitar 1: channel 1
- Guitar 1 Effect: channel 2
- Guitar 2: channel 3
- Guitar 2 Effect: channel 4
- Bass: channel 5
- Bass Effect: channel 6
- Drums: channel 10 (default)
Guitar Pro will then send MIDI data to the dedicated loopMIDI (Windows) or IAC Driver (Mac) port, with each track using the following MIDI channels.
Step 3: Configuring the DAW to Receive MIDI
The configuration for transferring MIDI data between Guitar Pro and a DAW follows similar principles across different software, with some specific variations depending on the DAW used. We’ll look at the configurations for Ableton Live and Logic Pro, but this method can also be adapted to other DAWs like FL Studio, Reaper, etc.
Ableton Live
- Open Ableton Live and go to Options > Preferences.
- Activate the MIDI input in the Link, Tempo & MIDI tab by checking the “Track” box for the loopMIDI port.
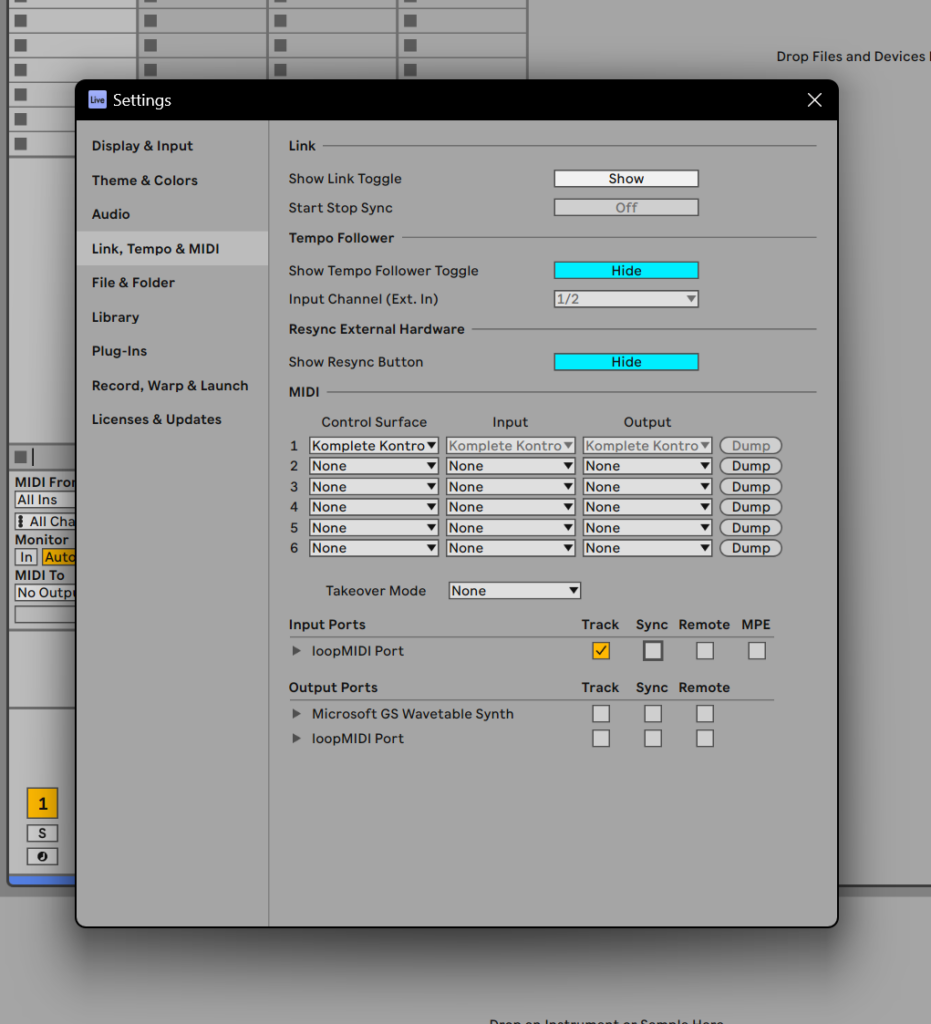
- Create MIDI tracks corresponding to the Guitar Pro tracks.
- Create a new MIDI track by clicking Create > Insert MIDI Track or using the shortcut Ctrl+Shift+T (Windows) or Cmd+Shift+T (Mac).
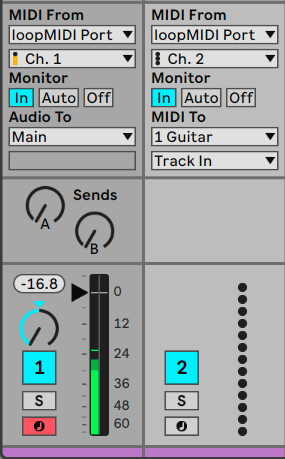
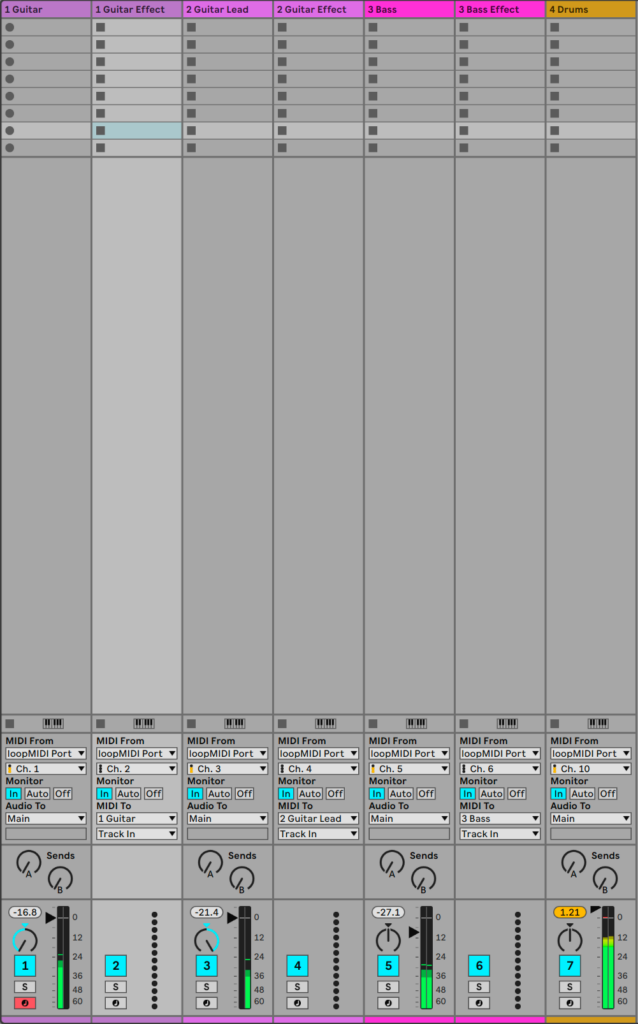
Setting Up MIDI Tracks for Music Notes
For each instrument, create a dedicated MIDI track for the music notes.
- In the “MIDI From” section of the track, select “loopMIDI” as the input source.
- Just below “MIDI From”, choose the appropriate MIDI channel (e.g., Channel 1 for Guitar 1 notes, Channel 3 for Guitar 2 notes, etc.).
Setting Up MIDI Tracks for Effects
For each instrument, create a dedicated MIDI track for the instrument’s effects.
- In the “MIDI From” section of the track, select “loopMIDI” as the input source.
- Just below “MIDI To”, choose the appropriate MIDI channel (e.g., Channel 2 for Guitar 1 effects, Channel 4 for Guitar 2 effects, etc.).
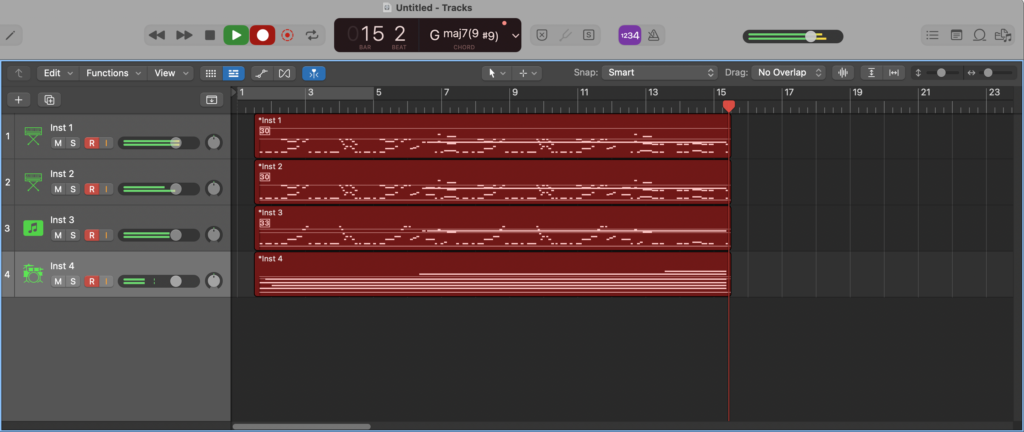
Arming MIDI Tracks
- Click the Arm (In) button on each MIDI track and start playback in Guitar Pro to hear the sound of the notes and effects of each instrument.
Step 4: Using VST with DAW Tracks
Adding VST to a Track
- Preparation
- Ensure that your VSTi are properly installed on your computer and recognized by Ableton.
- To verify this, go to Options > Preferences.
- In the “Plug-ins” tab, make sure the “Use VST2 Plug-In Custom Folder” and “Use VST3 Plug-In System Folders” options are enabled, then click “Rescan”.
Inserting the VST
- Open Live’s browser if it’s not already open.
- In the browser, go to the “Plug-ins” section to find your installed VSTs.
- Drag the desired VST from the browser and drop it onto the MIDI track you just created.
- For example, for the drum track (channel 10), you can use the “Studio Drummer” VST from Native Instruments.
Logic Pro
Setting Up Audio Output and MIDI Inputs
- Step 1: Launch a new project in Logic Pro or open an existing project.
- Step 2: Enable advanced settings mode in Logic Pro.
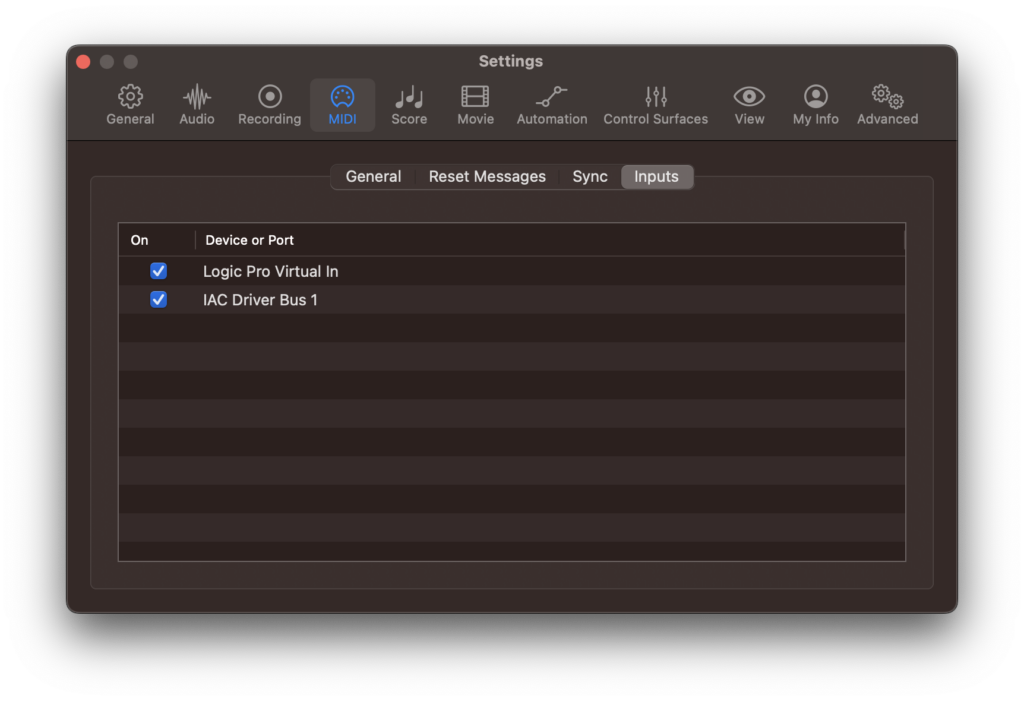
- Go to Logic Pro > Preferences > MIDI > Inputs.
- Check the box for the Virtual MIDI Cable used in Guitar Pro.
Verify IAC Driver is recognized in Logic Pro
- Go to Logic Pro > Preferences > MIDI > Inputs.
- Check the box for the Virtual MIDI Cable used in Guitar Pro.
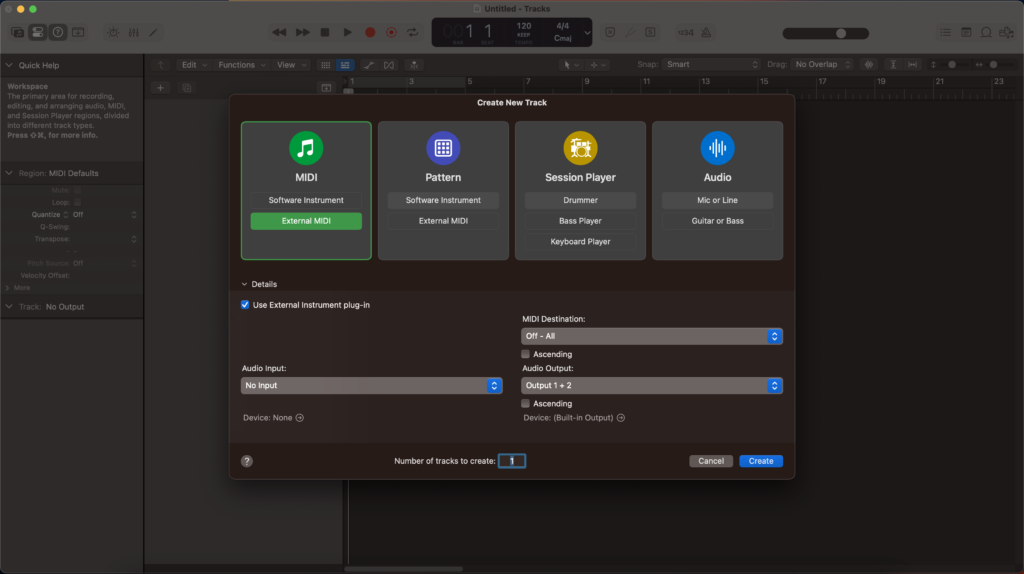
Creating MIDI Tracks
- Create external MIDI tracks for each instrument in your Guitar Pro project:
- Go to the Track menu > New.
- Select “External MIDI” and click Create.

Setting Up MIDI Tracks to Receive MIDI from Guitar Pro
- For each instrument, create a dedicated MIDI track:
- In the track pane, select “IAC Driver Bus” as the MIDI input.
- Choose the appropriate MIDI channel under “MIDI Input Channel” (e.g., Channel 1 for Guitar 1 notes, Channel 3 for Guitar 2 notes, etc.).
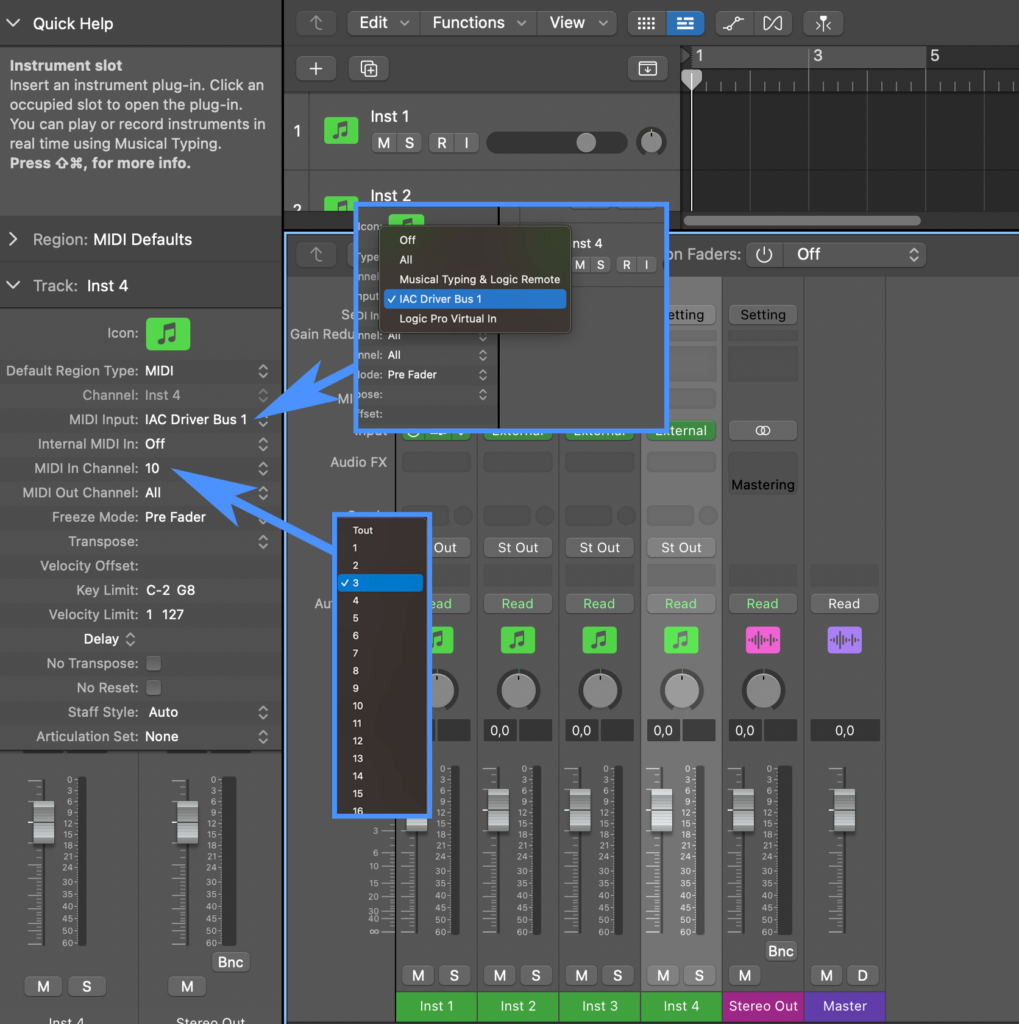
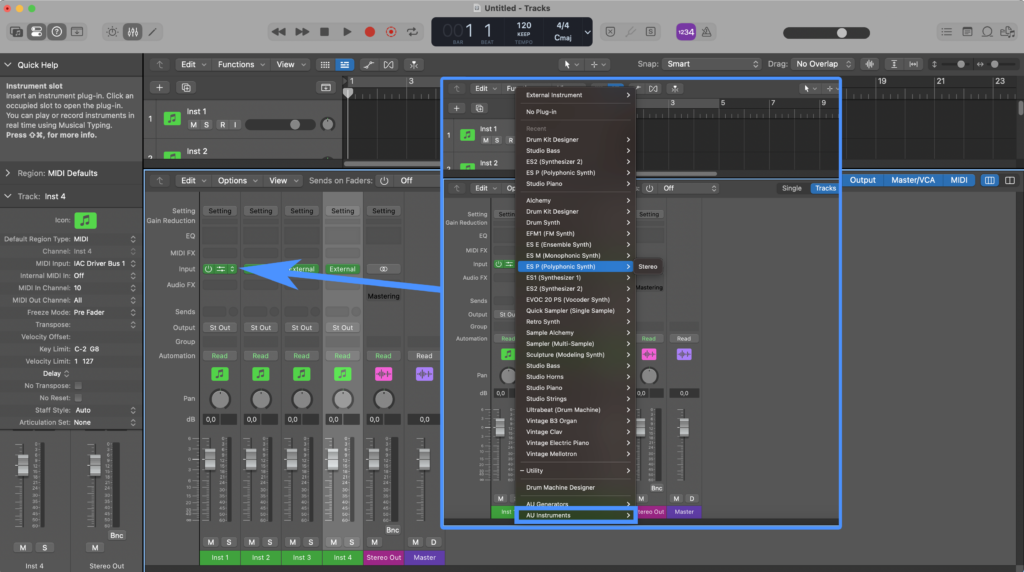
Selecting the VSTi
- In the mixer, choose the virtual instrument you want to use:
- In the “Input” box, click on the instrument slot of the MIDI track to open the instrument window.
- Select the desired VSTi for each MIDI track.
- You can find your own VSTi under “AU Instruments”.
Arming and Recording Tracks
- Step 1: enable monitoring for all MIDI tracks:
- Click the “I” (Input Monitoring) button next to the Arm (R) button and start playback of your score in Guitar Pro to hear all active MIDI tracks.
- Click the “I” (Input Monitoring) button next to the Arm (R) button and start playback of your score in Guitar Pro to hear all active MIDI tracks.

- Step 2: arm each MIDI track for recording:
- Click the Arm (R) button on each MIDI track to prepare them for recording.
- Click the global record button to start recording each instrument.
Recommended VSTi
To further enhance your experience, here are some VSTi recommendations:
- Pianos: Addictive Keys, Ivory II.
- Synthesizers: Serum, Massive, Sylenth1.
- Drums: Superior Drummer, EZdrummer.
- Guitars: Ample Guitar, Shreddage.
- Basses: MODO BASS 2, EURO BASS III.
Troubleshooting
- The DAW does not recognize the virtual MIDI port:
- Ensure that the MIDI port is correctly configured in the DAW’s MIDI preferences and that it is enabled.
- High latency or delay:
- Try reducing the buffer size in your DAW’s audio preferences or use ASIO drivers for better performance.
- VSTi compatibility issues:
- Make sure the VSTi are properly installed in the appropriate folders and that the DAW has scanned the plugins.
Unlike traditional music production software (DAWs), Guitar Pro does not fully support VSTi in a standardized manner. Although Guitar Pro can communicate with a DAW via MIDI, facilitating the use of VSTi, it is important to note that this integration can lead to compatibility issues and limited functionality for some VSTi.
Conclusion
By connecting Guitar Pro to your DAW and using VSTi, you open the door to a multitude of sonic and creative possibilities.
This integration not only allows you to transfer MIDI data to your DAW in real time but also enhances the sound quality of your projects while taking advantage of the flexibility and advanced production tools that DAWs offer.
Explore the new features of Guitar Pro 8.
About the author

Leave a comment
Your email address will not be published.
| Title | Artist | |
|---|---|---|
Girl All The Bad Guys Want

|
Bowling for Soup | |
|
The Thrill Is Gone
|
B.B. King | |
| The Air That I Breathe | The Hollies | |
|
Hotel California
|
The Eagles | |
| All Day and All of the Night | The Kinks |

Download hundreds of riffs, licks, and exercises to spice up your guitar practice time.
8 Comments
This was very helpful. It’s unfortunately sort of a pain to do this with each GP file.
Based on what you stated I think if was consistent with the channel selection on the GP side (i.e. channel 1 is always vocal, channel 2 is always rhythm guitar, etc.) I could do this one time and not have to manually add track each time. Thoughts?
Lastly I appreciated the simplicity of my old Roland Dr Rhythm 880 drum machine. It was much more closer to plug an play with GP. Are you aware of modern sound modules that act in a similar way with more than just drum and bass (the Dr 880 only did drum and bass)?
Hi Joe,
We invite you to contact our Support from this link if necessary:
https://support.guitar-pro.com/hc/en-us/requests/new
Hi, not sure if this is the same question as the one from Nicolas, but his there a way to let GP8 receive Midiclock info to be kicked of by e.g. Cubase ? There is a Midi-Input Section in Midi Settings…
Idea would be to sync the sheet Music with the DAW.
Best Marcus
Hi Marcus,
It is not ideal as it is not fully supported at the moment however Guitar Pro can send and receive midi clock, start and stop and song position midi messages. But it is an experimental feature.
With a virtual midi cable you should be able to connect Guitar Pro with your DAW and for exemple have the guitar pro playback controlled in your DAW.
You can go to the File > Preferences > Audio MIDI menu in Guitar Pro 8.
From this menu you have to choose your Virtual MIDI cable as MIDI input.
In your DAW you have to make sure that the MIDI Start, Stop, Continue and Song Position Pointer messages are correctly send to your Virtual MIDI cable.
Please make sure not to select the same Virtual cable as Input and Output from the Guitar Pro Audio MIDI preferences.
We can’t help you configure this Virtual MIDI cable on your computer unfortunately, but hopefully you should be able to find some useful information and ressources on the internet.
Is there a way to trigger guitar pro via logic so I can record it in logic in the correct time??
Hi Alexander,
I regret it is not possible to this day.
Super helpful, thank you!
Thank you Jeff, we’re glad we could help.