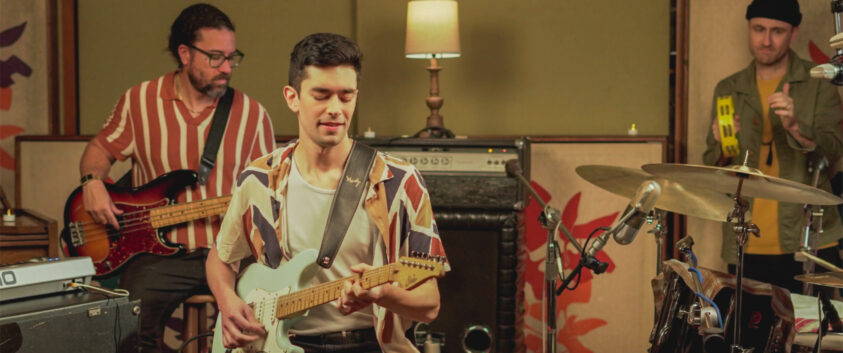
Feel the Funk: Pickup Music Playthrough
- lp-12-groove-01_grade_1-feel_the_funk.gp
Sometimes, everyone needs a break from shredding solos. Today, we’re going to get deep in the pocket and groove along to something seriously funky.
If you’re a fan of Prince or The Fearless Flyers, you’re in for a real treat. Donnie Laudicina knows a thing or two about funk guitar, and he’s here to give you a free lesson.
This is a performance piece from Pickup Music’s Groove Learning Pathway (the name speaks for itself). Let’s break the track down into bite-sized pieces, then reassemble them at the end and jam through the whole thing.
There’s also a video to accompany the lesson, with a live band jam track to play along to at the end.
First things first, we need to set the tone.
Make it funky!
To achieve Donnie’s versatile funk guitar sound, you ideally want to use a single coil pickup – preferably in the neck position. A Strat-style guitar perfectly fits the bill, but a Jaguar or Tele will do nicely too.
Any amp will do as long as you can get a solid clean tone from it. If you want, add a little touch of phaser if you have the option.
Okay, we’re set up, plugged in, and ready to funk it up.
Strumming-hand technique
One key component of funk guitar – always keep your right hand in motion! Even during pauses or transitions between chords.
This will help you maintain a steady tempo and help your strumming stay in the pocket at all times.
If you’re confident with counting 16th notes at a decent tempo, check out this short guide to funk guitar.
A-section
Here’s the meat and potatoes of this track. If you lock this first part down, the rest will be a walk in the park.
Make sure you experiment with the techniques and chord shapes in the lesson – they may come in handy if you want to make your own funk song.
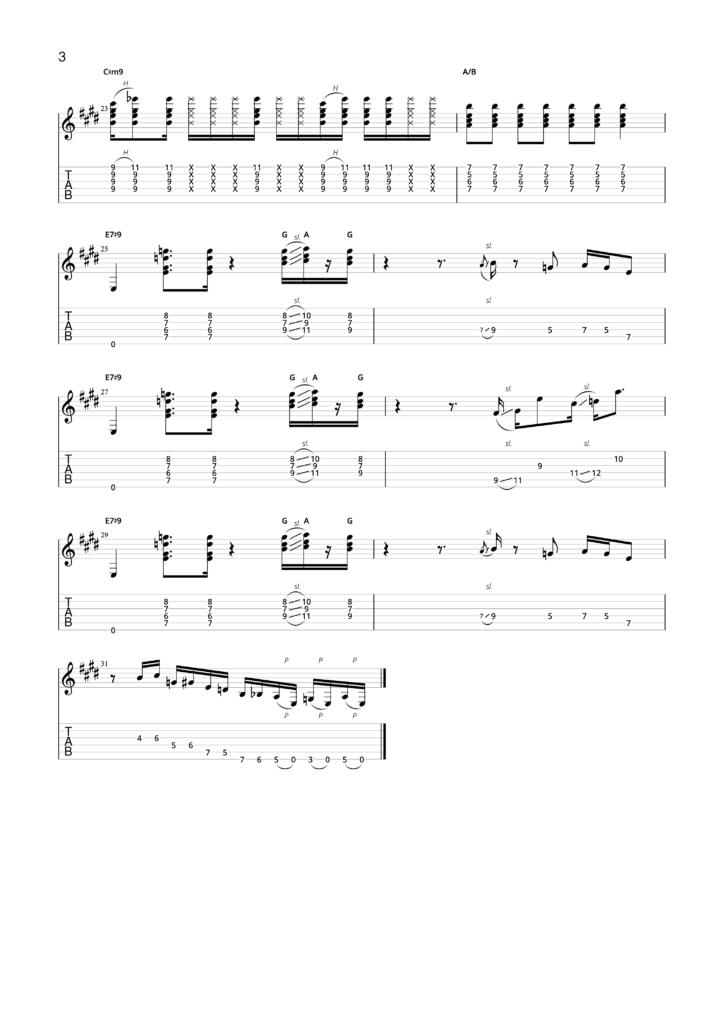
E7(#9) chord
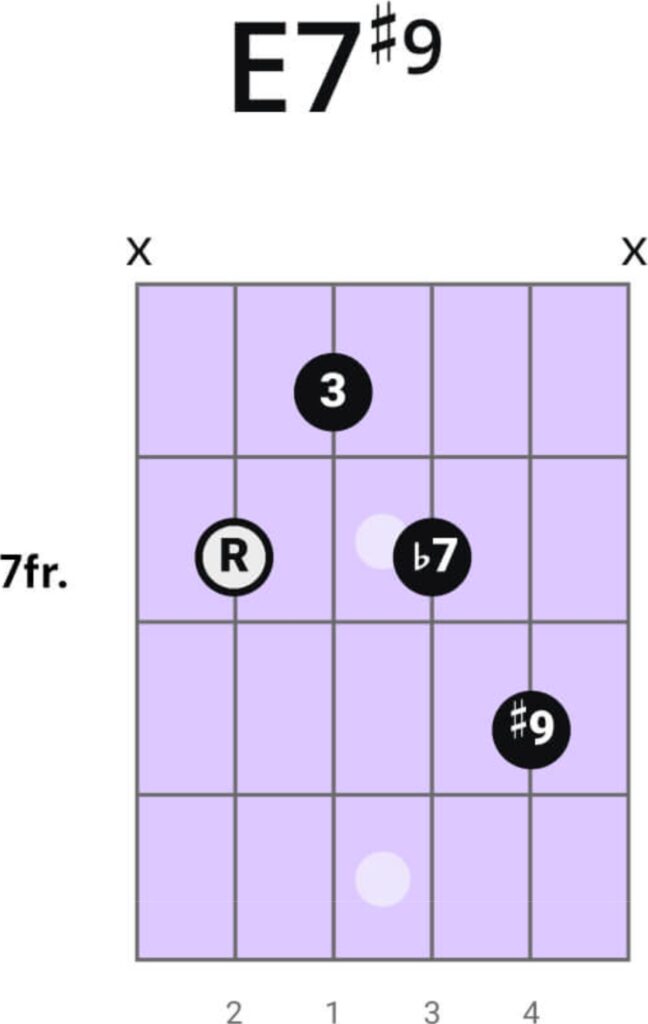
The E7(#9) chord, often referred to as the “Hendrix chord,” provides a distinctive sound that is both funky and slightly dissonant. Here’s how to play it:
- Start by playing the open E string.
- Place your middle finger on the 7th fret of the A string.
- Index finger on the 6th fret of the D string.
- Ring finger on the 7th fret of the G string.
- Pinky on the 8th fret of both the B and high E strings.
G triad slide
Next, you’ll play a G triad shape, slide it up two frets, and then slide back down to the original G position.
Here’s the diagram for the G triad:
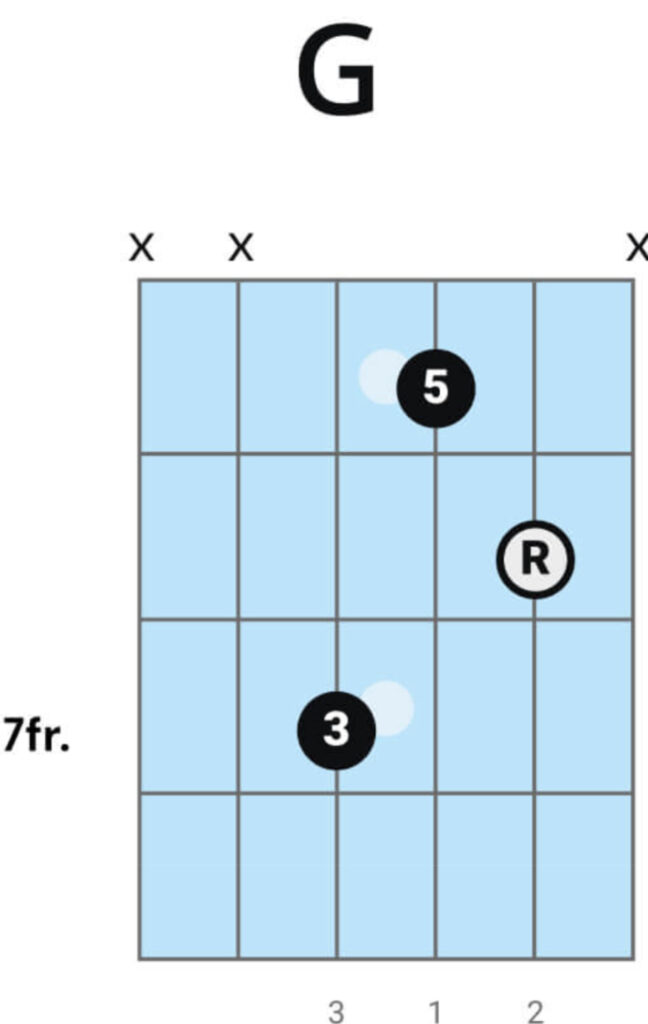
- Index finger on the 3rd fret of the high E string.
- Middle finger should be on the 4th fret of the G string.
- Ring finger goes on the 5th fret of the D string.
Strum this shape and slide it up two frets (to the 5th, 6th, and 7th frets, respectively) and then slide it back down to the original position.
Single-note line
The single-note line adds melodic interest to the riff.
Here’s how to play it:
- Slide up to the 9th fret on the D string.
- Move down to the 5th fret on the D string.
- Play the 7th fret on the D string.
- End on the 7th fret of the A string.
Combine them!
Practice each part individually, and once you’re comfortable, connect them into one funky sequence.
Try to make the whole loop sound laid-back but still tight. Once you’ve mastered it, move on to the next section.
A-section variations
The section you just learned plays around four times. It’s the same basic riff, just with a few tweaks to keep things interesting.
Single-note line variation
The second time around, you play a different lick. The E7(#9) to G triad slide doesn’t change, but the single note line does – it goes like this:
- Slide from 9th to 11th Fret on the A String
- Jump to 9th Fret on the G String
- Slide from 11th to 12th Fret on the D String
- Jump to 10th Fret on the B String
Walk-up
The third time around is the same as the first. But the fourth time doesn’t end in a single-note line. Instead, we do this little funky little walk-up.
[either tabs or 4 separate chord diagrams]
It’s a tricky one, but you’ve got it!
B section
Okay, now for a shift in dynamics. There may be some unfamiliar chord shapes here, so take time to familiarize your fingers with them before trying it at full tempo.
A9 Shape
This is a tasty chord. The A9 adds a jazzy flavor to the funk rhythm.
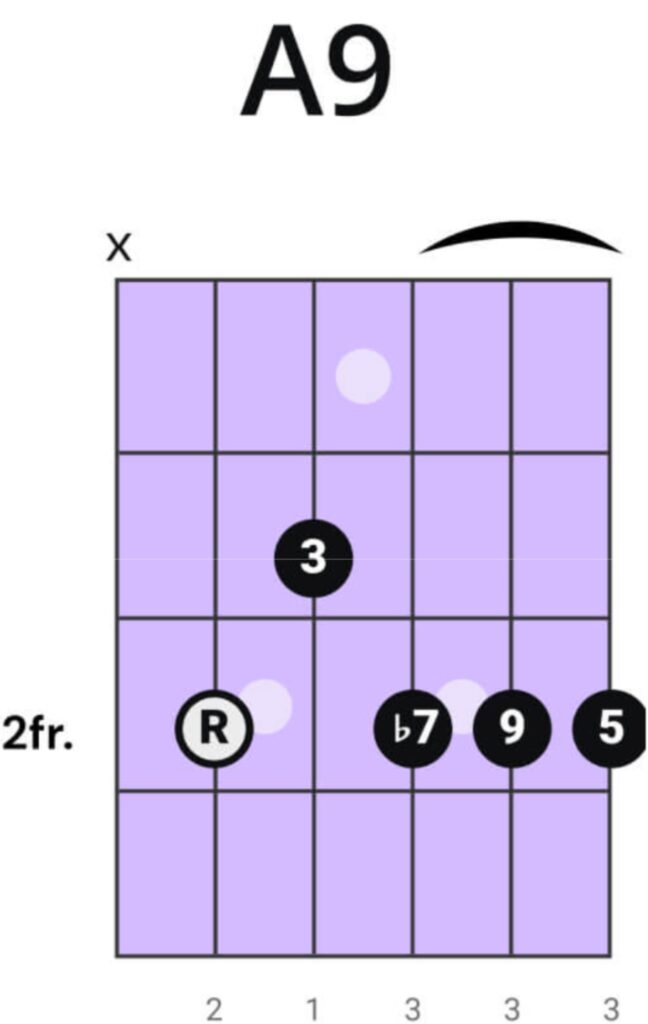
- Place your middle finger on the 12th fret of the A string.
- Start by placing your index finger on the 11th fret of the D string.
- Your ring finger will bar the 12th fret of the G, B, and high E strings.
- Strum all these strings together to form the A9 chord.
G#7(#9#5) Chord
The chord name might look like something you accidentally butt-dialed, but don’t get hung up on that! This chord is perfect for funky rhythms and leads beautifully from the A9.
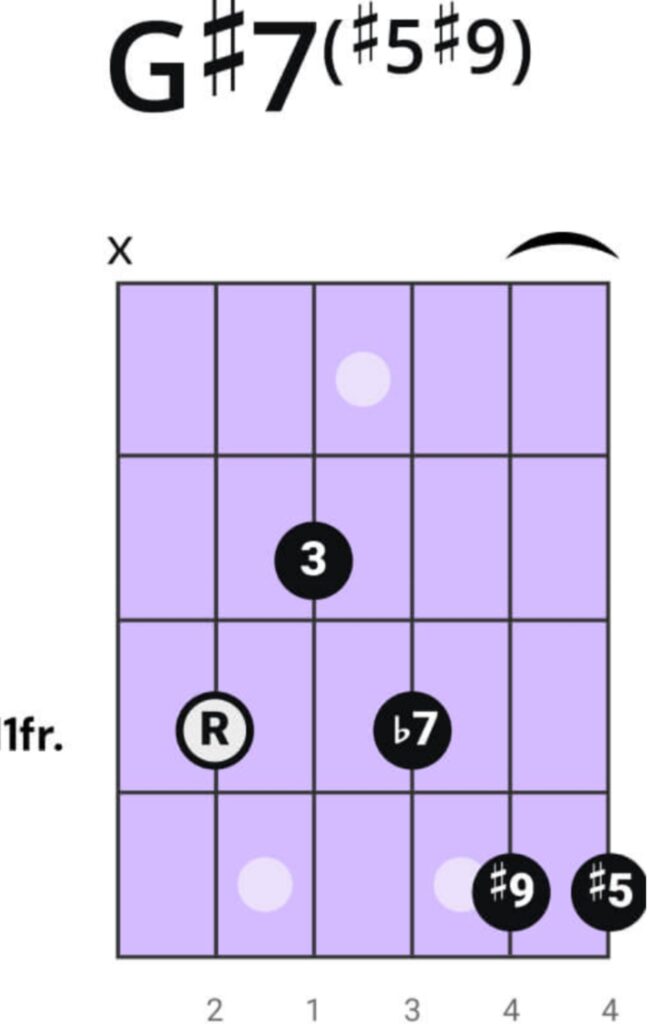
- Index finger on the 10th fret of the high E string.
- Middle finger on the 11th fret of the G string.
- Ring finger bars the 11th fret of the D and A strings.
- Pinky on the 12th fret of the B string.
- Strum all the strings except for the low E string.
C#m9 Chord
This adds a smoothness to the progression. The hammer-on embellishment almost gives it a neo-soul vibe.
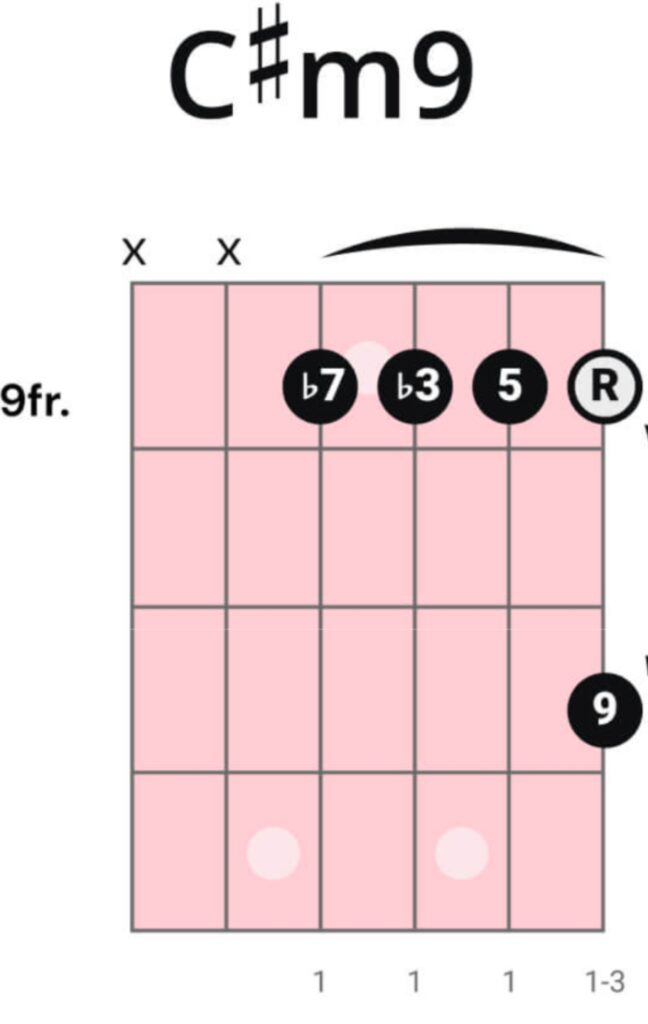
- Index finger across the 9th fret of the D, G, B, and high E strings.
- Ring finger on the 11th fret of the A string.
- Strum these strings together to form the C#m9 chord.
- Add a hammer-on with your ring finger on the 11th fret for extra flavor.
A/B
This chord gives a suspended feel and works as a nice transition back to the ‘A section.’
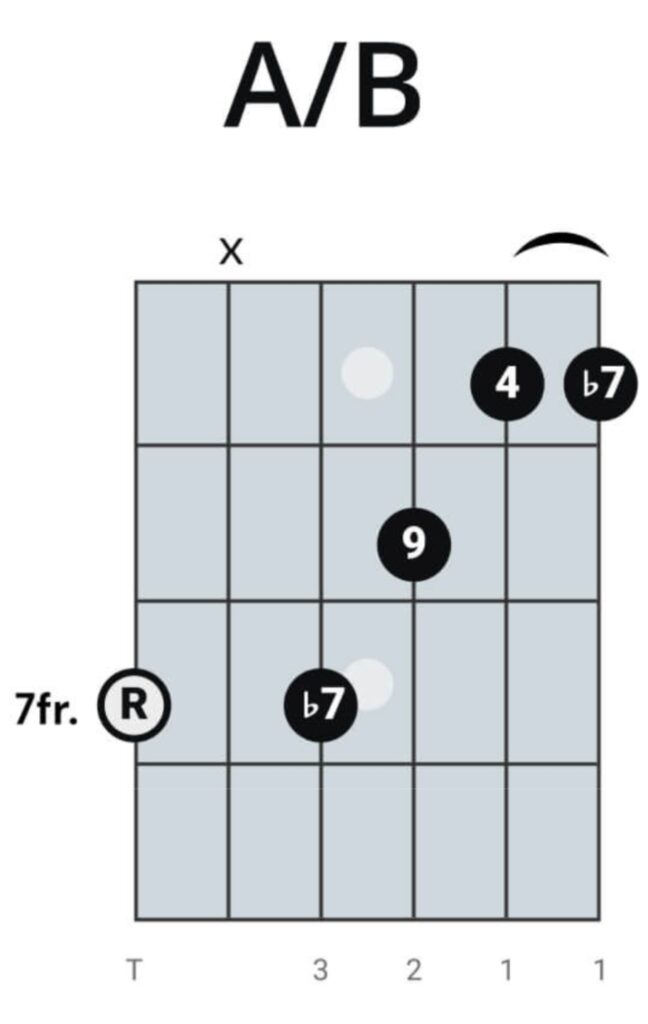
- Index finger on the 6th fret of the G string.
- Middle finger on the 7th fret of the D string.
- Ring finger on the 7th fret of the B string.
- Optionally, use your thumb to play the 7th fret of the low E string.
- Strum all these strings together, including the open A string.
Unison outro lick
Phew! That was a lot of new chords. All that’s left to learn is one more single note line – the cherry on top! Here it is:
Bring it all together
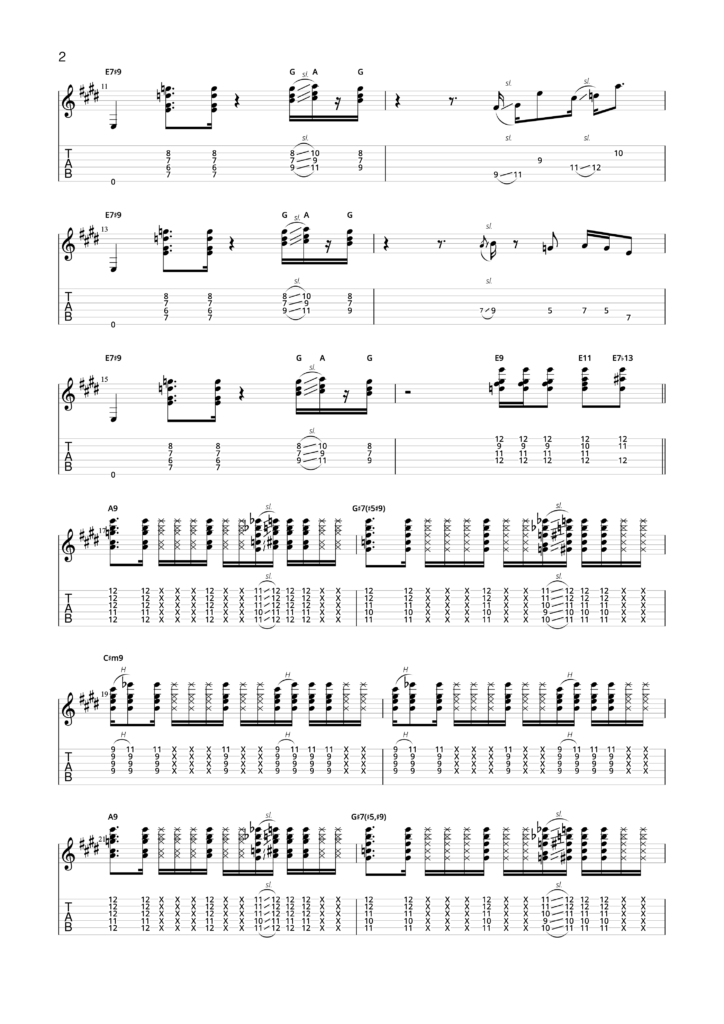
When you put it all together, the structure goes like this:
A-section
- E7(#9) – G triad slide – Single-note line
- E7(#9) – G triad slide – Single-note line variation
- Same as 1.
- E7(#9) – G triad slide – Walk-up
- Repeat the whole section again
B-section
- A9 – G#7(#9#5) – C#m9
- A9 – G#7(#9#5) – A/B
- Back to the A-section and finish on the outro lick!
Here’s the TAB for the whole piece:
[add tab]
Final performance
Practice playing the entire piece from start to finish, focusing on keeping your right hand moving through those 16th notes the entire time.
Work on smooth transitions between sections. Remember – groovy progressions need to sound super relaxed.
With dedication and practice, you’ll be feeling the funk in no time!
Want more?
Of course, you do.
Don’t worry – we’re not going to leave you hanging. If you want to dive deeper into funk guitar and explore more of the Groove Learning Pathway, you’re in luck!
Pickup Music is currently offering a 14-day free trial to all its courses – so grab it while it’s hot.🔥
Leave a comment
Your email address will not be published.
| Title | Artist | |
|---|---|---|
Rock Bottom

|
UFO | |
| Where Do You Go To (My Lovely) | Peter Sarstedt | |
Dead Flowers

|
The Rolling Stones | |
Black Night

|
Deep Purple | |
Poison

|
Alice Cooper |

